When we moved into our new house, it quickly became apparent that we would need to do something to warm up the master bedroom. It was the coldest room in the house, and November weather in Cleveland is a pretty good motivator.
So I started trying to think of ways to warm up the room. Traditional methods of insulation were out of the question in the short term – the large open attic above was too big of a project to do at the time and we couldn’t use something like blown-in cellulose insulation because our stately Tudor duplex had knob-and-tube wiring. I came up with this fast, cheap, easy-to-build project instead. You can use it to decorate your room and even save you a few bucks on your heating bill.
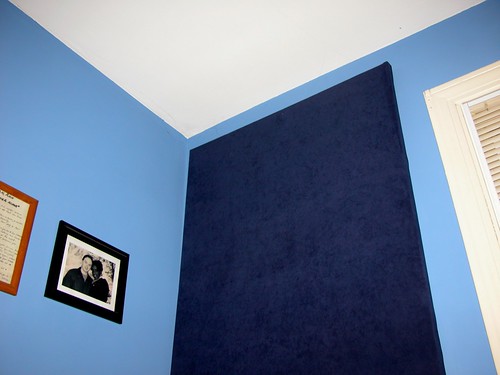
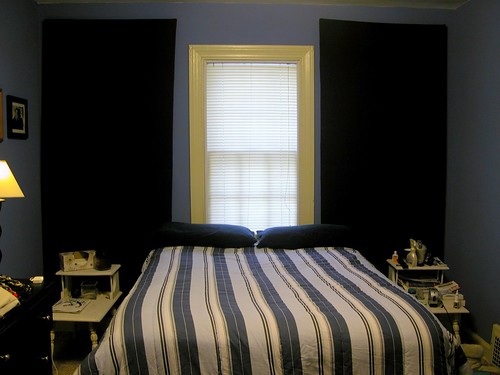
Here’s a sneak peak at the end result:
It’s basically a frame with some stylish fabric stretched over like the canvas in an oil painting. It’s backed with mylar which means it acts as a radiant heat barrier, keeping you toasty.
Here’s what you need:
- Some 1×2’s – buy whatever is cheapest (and not warped) at your home improvement store.
- Wood screws – maybe 1 1/2 inch to 2 inch.
- Cloth – something that would look nice on the wall. Pick out whatever you like, it should be a little stretchy.
- Aluminized mylar – better known as space blankets. Order it online or buy it at the store – it should be a dollar or two for a large sheet.
- Duct tape (of course)
- Some tools: A staple gun (and staples), tape measure, drill, screwdriver, saw.
So first, a tiny little bit of theory. Heat moves in three ways – convection, conduction, and radiation. Your house is losing heat in the winter because of these three along with air infiltration – drafts of cold air from windows and doors. Most insulation does it’s job by preventing conduction (by putting air pockets between materials) or by stopping convection in air pockets. Infiltration can be combated with storm windows, weather stripping, and vapor barriers.
Insulation is measured by R-value. This project will only help a little bit when it comes to convection or conduction – the main point here is to reflect radiant heat back into the room. So don’t ask about the R-value – like other radiant barriers, that’s not really the point.
Step 1 – Figure out the size you need.
Approach the cold, heat-sucking wall you wish to insulate. Now, figure out how large of a frame (or frames) you wish to build. This is up to you – you can go floor-to-ceiling like I did or make a series of smaller frames. Measure it all out, draw some pictures, and add up the lengths of the sides to figure out how many feet of 1×2’s you need. If you’re building anything larger than three feet, you may want to include cross-beams to help the frame keep it’s shape.
One thing I might recommend – try to make your frames less than 40 inches wide. That’s because fabric is often sold in bolts that are 44-46 inches wide. if you want wider you’ll have to do some searching or some sewing.
Step 2 – Build the frame.
Cut the 1×2’s to size. As always, measure twice, cut once. You can join the sides together with fancy dovetail joints if you want, but below you’ll see a drawing of the simple butt joint I used (okay, stop giggling).

Pre-drill the holes and then put in the screws- it’s that simple. If you’ve measured right and cut your sides right you should have reasonably right angles.
Step 3 – Pick out your fabric and cut to size.
Go to your local fabric store or other retailer and pick something out. Bring your significant other. Match your paint. I like solid colors with some kind of texture, but if you want the print of Garfield pushing Odie off the table, go for it.
Once you have your fabric, measure and cut it to the size of your frame. Add a good two to three inches (or more) on all four sides.
Step 4 – Stretch the fabric over the frame.
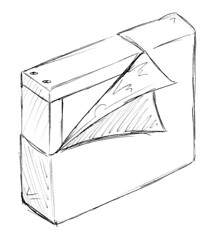
Place the fabric face down on a large flat surface. Now you have a choice – you can either put the Mylar directly behind the cloth or put it on the back of the frame, creating an airspace in between. If you want to do the former, place the mylar on top of the fabric now (see diagram below).
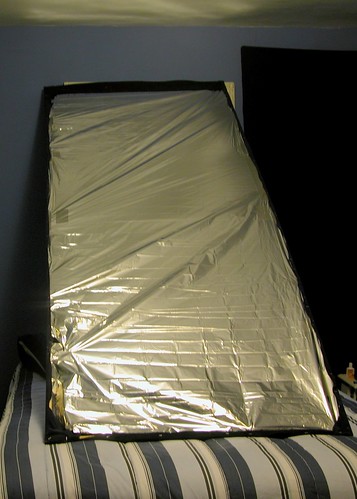
In my project I put the mylar on the back, creating an airspace. This worked fairly well bu the mylar is easy to damage so I’m not sure I’d do it that way again in the future. If you do decide to place it on the back, make sure you place duct tape on the mylar anywhere you want to staple it to the frame – otherwise it will tear.
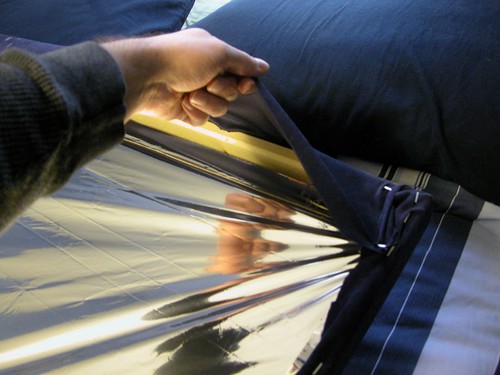
In any event, place the frame on the fabric with equal margins on all four sides. Stretch the fabric back over the frame and staple along the back. Here’s a photo:
Step 5 – Hang it on the wall.
Now you have your frame, ready to reflect heat. Hang it on the wall the same way you would a painting. Step back. Enjoy.
Here’s the end result in our bedroom. The room is a bit of a mess because we were in the process of moving, but you can see how I’ve managed to cover a large are of the cold wall in an inexpensive and eye-pleasing way.
If you have any questions or comments, please feel free to comment below.
Flashbacks to Science Olympiad and Keep the Heat! I think of it every time I hear ‘R-value’.
You could have installed a radiant barrier in the attic where the blown insullation wasnt an option. The installation is ralatively easy and it would help the house as a whole as opposed to just one room.
You should also look into window energy films on that window, as well as making sure the window is well weatherized to eliminate any drafts (heat exchange).
So, now that it’s getting cold, any follow-up on how effective these are?
So how well did this work for you?
great work, i love it!
—————————–
To improve art level, it is good to make reproduction oil paintings. Just have a try!
Great idea
I’ve read that in order for a radiant barrier to work it must have at least 1 inch of airspace. Does putting fabric directly on top of the barrier stop it working? Because cotton is a breathable fabric, does it not affect the airspace?