A quick, simple tip for taking better group photos

DSCN2027 The group photo – that awkward assembly of a group of friends or colleagues trying their hardest not to look like they are posing while they violate each others’ personal space.  For a long time I thought it was impossible to take a good group photo, or at least it required huge amounts of creativity in choosing a setting, angle, or lord help us, props.

But I stumbled on a technique that is quick, easy, and seems to work more often than not.   I’m not necessarily claiming I invented it, but I will happily share it with you.

Step 1:  Tell the group the to act like it’s the worst day of their lives, and take a picture.

I know, it sounds like exactly the wrong thing to do.  You want to immortalize smiles and togetherness, not hatred and melancholy.  So here comes step 2…

Step 2:  Now tell the group to act like it’s the best day of their lives.  Take the picture, upload it to Flickr or whatever you use, and bask in the many kudos you will receive.

The key is that step 1 gets everyone loosened up, so that they’re willing to ham it up for the final photo.  It also gives everyone a good emotional contrast to gauge how happy to be in the happy photo.  No more sneers or unsure half-smiles.

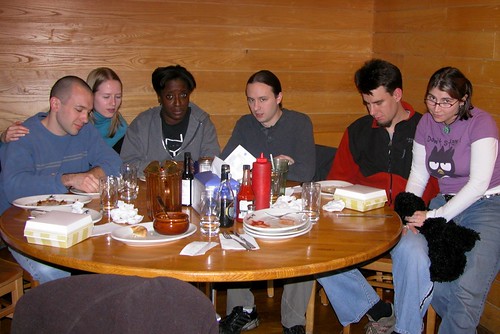
Here’s a case where it came in handy – the setting was a restaurant, with bad lighting and a big yellowish wood background.  The camera was held by a random waitress.  Once in a while you’ll get a server who’s studying photography in art school, but not always, so this tip is a great way to make sure you get a fun photo.  First, everyone is sad:

Saddest day of our lives at Tommy's

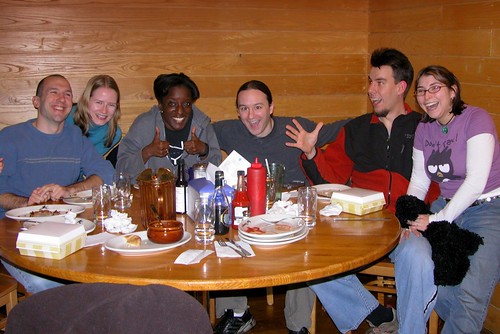
Then, they are insanely happy!  Doesn’t it look like we were having a good time?

Happiest day of our lives at Tommy's

Keep in mind that the sad photo doesn’t have to be convincing – note that two of the people here are having a hard time keeping a straight face.  We don’t want great acting, we want to shake everyone up a little.

DSCN2026

And it works!

DSCN2027

How do you take a good picture on a gray, rainy day?  Again, we use the procedure.  Saddest day of their lives :

DSCN1106

Happiest day of their lives!  Smiles despite the miserable weather.

DSCN1105

Go forth and use the technique.  I’ve created a Sad vs. Happy photo pool in Flickr.  Please share any shots you take to it.

Have you tried it and it worked?  Didn’t work?  Got a better idea?  Leave me a comment below.

Why I am sharing my photos with a Creative Commons License

DSCN0563 I do a bit of amateur photography.  I’m not very strong technically and I don’t have particularly good equipment, but I enjoy finding interesting angles and compositions.  I’ve been putting up photos on Flickr for a while to share them with friends and the public.  I also have an account on Panoramio with some photos that show up in Google Earth.

No matter the particular photo site used, sharing photos online has been a great experience.  I’ve had a number of encouraging comments on my photos and people have emailed me to ask if they could use a photo in a report for school or a pamphlet for their non-profit.

When I signed up with Flickr I noticed they had options to add Creative Commons licenses to photos by default.  I’m more than happy to let people use my photos for noncommercial purposes, so why didn’t turn on Creative Commons licensing from the start?

Part of it was the number of options available.  Creative Commons licensing allows other people to share your work but it’s not the same thing as releasing the copyright or putting photos in the public domain.  You have some options:  do you want people to be able to make money off your work, or do you just want it available for non-profits, educational, and personal use?  Do you want people to be able to alter and remix your work or just present it as-is?

DSCF0662 So I was a bit struck by the paradox of choice and decided to skip ahead and start uploading photos.  In retrospect, that was a mistake.

There’s a great page at the Creative Commons site that explains the options.  I am going to license my photos with an Attribution Non-commercial (by-nc) license.  That license covers my default attitude about my amateur photography – everyone is welcome to use my photos for non-commercial purposes, so long as they give me credit. This is, of course, in addition to fair use rights that people already have.

Another important point:  it doesn’t mean people can’t use it commercially, they just have to contact me and get permission.  Depending on the use, I might put a price on it.  And I can always sell prints or make products myself.

I might even switch over to allow commercial use as well, if I can get over my delusions of being the next Ansel Adams.

San Francisco skyline and flowers The abuse and incessant extension of copyright might not seem like a life-or-death issue, but it’s one of those issues where technology and public policy are inextricably linked.  It’s like the problem of software and business method patents.  There’s a great story by Spider Robinson that illustrates what happens if taken to extremes.

So take a look at the licenses and consider applying the appropriate copyleft to your work.

Project: Warm up a room with an Insulating Wall Hanging

When we moved into our new house, it quickly became apparent that we would need to do something to warm up the master bedroom. It was the coldest room in the house, and November weather in Cleveland is a pretty good motivator.

So I started trying to think of ways to warm up the room. Traditional methods of insulation were out of the question in the short term – the large open attic above was too big of a project to do at the time and we couldn’t use something like blown-in cellulose insulation because our stately Tudor duplex had knob-and-tube wiring. I came up with this fast, cheap, easy-to-build project instead. You can use it to decorate your room and even save you a few bucks on your heating bill.

Here’s a sneak peak at the end result:

Heat-reflecting and stylish

It’s basically a frame with some stylish fabric stretched over like the canvas in an oil painting. It’s backed with mylar which means it acts as a radiant heat barrier, keeping you toasty.

Here’s what you need:

  • Some 1×2’s – buy whatever is cheapest (and not warped) at your home improvement store.
  • Wood screws – maybe 1 1/2 inch to 2 inch.
  • Cloth – something that would look nice on the wall. Pick out whatever you like, it should be a little stretchy.
  • Aluminized mylar – better known as space blankets. Order it online or buy it at the store – it should be a dollar or two for a large sheet.
  • Duct tape (of course)
  • Some tools: A staple gun (and staples), tape measure, drill, screwdriver, saw.

So first, a tiny little bit of theory. Heat moves in three ways – convection, conduction, and radiation. Your house is losing heat in the winter because of these three along with air infiltration – drafts of cold air from windows and doors. Most insulation does it’s job by preventing conduction (by putting air pockets between materials) or by stopping convection in air pockets. Infiltration can be combated with storm windows, weather stripping, and vapor barriers.

Insulation is measured by R-value. This project will only help a little bit when it comes to convection or conduction – the main point here is to reflect radiant heat back into the room. So don’t ask about the R-value – like other radiant barriers, that’s not really the point.

Continue reading